On the North American frontier, it was not uncommon for the pioneer housewife to bake 21 pies a week – one for every meal.
-from Professional Cooking for Canadian Chefs, Sixth Edition
 I’ve posted several recipes in which I make a hand-waving reference to, “your favourite pie dough” or “standard pie dough” without giving any idea of what exactly I mean by that. (Examples: Rabbit pie, pumpkin pie, sour cherry pie, pheasant pot pie.) For the sake of completeness and concision I thought I’d tell you my preferred recipe and method for making North American pie dough.
I think we’ve all had both very good and very bad pies in our time. Good pie dough is firm, but tender. It holds it shape pretty well when you cut it. It’s flaky and layered, but in a rustic, irregular way, as opposed to puff pastry, which is flaky and layered in a precise, regular way. It tastes above all of the fat that was used to make it, usually either butter or lard. It has been cooked through; there is never a layer flabby, soggy, uncooked dough. It has been slightly browned on the surface, changing and enriching the natural flavour of the fat and flour.
The classic North American pie dough is great because everyone from your great aunt to the pastry chef at the Culinary Institute of America uses the same recipe. Actually it’s a ratio, and it looks like this:
Pie Dough – 3:2:1, flour, fat, and liquid. A bit of salt also helps. Notes on the ingredients:
- We want some gluten development, so the flour is usually all-purpose.
- The fat is up to you, and can vary with the type of pie you’re making. For fruit pies I always use butter. For meat pies I might use a blend of lard and butter. I grew up on pies made from shortening, though this has fallen out of favour because it contains trans fats. Whichever fat you decide to use should be extremely cold.
- The liquid is almost always ice water, but it could easily be milk.
Mixing. To develop the characteristic flaky texture, we need the fat to be in little pieces that will separate the dough into layers. Traditionally the fat might be crumbled into the flour by hand, or “cut in” by using two knives to break it into smaller and smaller pieces. I prefer to use a box grater. The pieces of fat are on the larger end of the desirable-size spectrum, but some will break down further as we mix the dough. It’s way faster than crumbling or cutting-in.
So, mix the flour and salt together, then incorporate the grated fat. Stir in the ice water with the handle of a wooden spoon (doesn’t over-mix the dough, easy to clean…) until the dough comes together. Knead very briefly until the mass is workable. It doesn’t need to be – indeed it probably shouldn’t be – a smooth, homogeneous dough. Cover with plastic wrap and refrigerate about an hour before rolling out. This will re-chill the fat so that it doesn’t start melting out, and gives the gluten a chance to rest.
Rolling. Proper thickness is about 1/8″.
Baking. Exact baking times and temperatures will vary with the type of pie being made, but I usually use the old-fashioned two-stage pie baking method that our moms and grandmoms used. The first stage is a high-heat bake at 425°F with the pie on or near the bottom rack of the oven. This stage only lasts for fifteen minutes, but it cooks and lightly browns the bottom of the pie. The second stage is a lower temperature bake, maybe 350°F, for a longer period, maybe thirty to forty five minutes, with the pie on a middle or high rack. This bakes the interior of the pie and browns the top of the crust.
Undercooked Pastry: A Rant
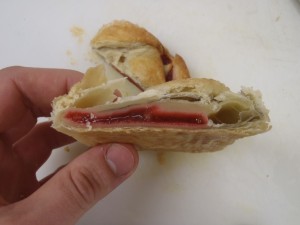 At right is a strudel (the French style, made of braided puff-pastry, not the Austrian style…) that is sold at a reasonably popular coffee shop.
The staff that bakes these convenience products no doubt look for a certain pale golden brown colour to form on the outside of the pastries, then immediately pull them from the oven – even though there is still a thick mat of raw dough inside!
Make sure your dough is cooked all the way through, so that it’s flaky and tender. Don’t just look at the dough: touch it to make sure it’s firm throughout.
It may happen that vulnerable, exposed portions of crust brown well before the interior of the pie is done baking. This requires emergency attention. Crumble aluminum foil, shiny-side-out, around the bits of crust in danger of burning. You can continue to bake the pie as usual; the foil will prevent further browning. This is mostly a concern with blind-baked tart shells, but may come up when baking conventional pies, too.
Leftover Pie Dough. For medium-sized sheets of leftover pie dough, I make free-form pies, ie. pies that are not pressed into a pie plate, but loosely folded around a bit of fruit, like so:

For small pieces of leftover pie dough, I simply lay them on a sheet pan and bake them. Lisa and I call them pie sticks. We dip them in jam and eat them, or stick them in bowls of ice cream.
Pie stick sundae:

When you bake your pie (and/or pie sticks) have you tried brushing them with an egg/milk wash, then sprinkling on coarse sugar?