 Kim chi is an ace up the sleeve, delivering instant, intense flavour to bland ingredients like rice, flour, and eggs. And unlike most condiments that pack that kind of punch – things like hot sauce or fish sauce – kim chi is quite wholesome.
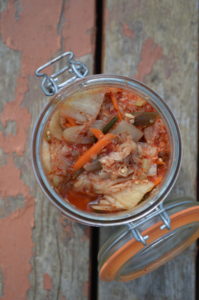
Kim chi fascinates me because it is simultaneously very similar to and wildly different from a preparation that I am much more familiar with: sauerkraut. Both are ostensibly fermented cabbage, but where sauerkraut is thinly sliced and acidic, with an almost floral, yeasty aroma, kim chi is chunky, salty, often burn-your-face-off spicy, with something of a fishy aroma. Sometimes, amazingly, it is also effervescent.
Sauerkraut is made with European-type cabbages like savoy. The relatively low salt content (I use 1.89% salt) and the relatively warm fermentation temperature (15-20°C) favour both the acid-producing bacteria as well as the aroma-producing yeasts that give sauerkraut its characteristic flavours.
Kimchi can be made with any vegetable, though nappa cabbage is by far the most common. It almost always has other vegetables mixed in, things like daikon, green onion, and carrot. A relatively high salt content (~3%) and relatively cool fermentation temperature (4-10°C) favour gas-producing bacteria that give kim chi its subtle effervescence.
While every crock of sauerkraut is a little different, there are really only a few ways that styles of sauerkraut differ from one another. Kim chi is a much more complicated and variable preparation, and when I first undertook its production it made my head swim.
Like many white kids my age, I owe a lot of my knowledge and appreciation of many Asian preparations to David Chang. The kim chi recipe in his Momofuku Cookbook is the first I ever made. It is a frustrating recipe as it uses very imprecise measures (“one small to medium head cabbage”) and so can have quite inconsistent outcomes. My other beef with the recipe is that it is incredibly sweet, with sugar being the most important ingredient after cabbage, about 12% of the weight of the cabbage by my measurement.
So starting with the Chang recipe I made several iterations week after week as my mother-in-law continued to bring me heads of nappa cabbage from her garden. By the fifth iteration I had a pickle I was quite happy with. This is how I answered some of the many questions that came up.
What vegetables to use in kim chi?
I came to realize that a major contributor to the flavour that I expect from kim chi, the funky part, is more from daikon than it is from fermentation. So in addition to nappa cabbage I use daikon. Green onion is essential for the flavour I was seeking, plus it’s a good pop of green in the sea of fiery red. I also appreciate the visual contrast and crunch provided by carrot.
How to achieve 3% salt content?
One of the most important things I wanted to do with my recipe is dial in the salt content so that I knew exactly how many grams of salt to add per kilo of vegetables. In On Food and Cooking Harold McGee says kim chi should be about 3% salt by weight. The tricky bit is that we’re using kosher salt and fish sauce, which is extremely salty. I decided to take the kosher salt quantity from my sauerkraut recipe, then add the fish sauce on top of that.
Should l use sugar in kim chi?
My main problem with the Chang recipe is that it’s way too sweet. I plan to eat large amounts of kim chi, and want to feel good about it, so I entirely removed white sugar from my recipe. There is some sugar in the fish sauce, so the kim chi is not entirely devoid of sweetness.
Do you really need to use gochugaru, Korean chili?
In a word: yes.
I was extremely skeptical of the websites that say you absolutely must use gochugaru to make kim chi. I figured it was a bit like a website telling you that you need to use Italian olive oil to make proper pasta: just a bit of pretension. Turns out they are more or less correct.
Gochugaru is quite different than North American chili flakes, mainly in that all the seeds of the pepper have been removed. The flavour is very fruity, and a touch smoky. As the seeds and surrounding membrane are a major source of capsaicin, Korean gochugaru is actually not as hot as chili flakes, which means you can add a lot of it before the mixture gets too spicy. This is good because it gives the kim chi a vibrant red colour. The other important difference is that gochugaru is ground to a consistency finer than chili flakes, but coarser than chili powder.
I made several batches with standard North American chili flakes. They were all tasty, but did not have the real flavour and red-stained brilliance of true kim chi.
What fish sauce to use?
This is one component that I haven’t played around with yet. I had a bottle of Squid Brand Fish Sauce in my fridge, so that’s what I used in all my experiments. It’s likely that different brands have different concentrations of salt and sugar and may require adjustments to the recipe.
Kim Chi Recipe
I chose to write my kim chi recipe as a baker’s formula. I distinguish between two types of ingredient: the vegetables and the flavouring agents. When added up the vegetables total 100%, like the flour in a baker’s formula.
Kim Chi
from scratch

Ingredients
- 87.89% nappa cabbage, cut into strips about 1″ broad and 2-3″ long
- 7.29% daikon, cut into thin half moons
- 3.30% green onion, sliced into 2″ lengths
- 1.52% carrot, julienne
- 1.89% kosher salt
- 7.12% fish sauce
- 3.43% fresh garlic, finely minced in a food processor
- 3.43% fresh ginger, finely minced in a food processor
- 1.36% gochugaru
Procedure
- Combine cabbage, daikon, green onion, and carrot. Toss with salt. Cover and let stand at a cool room temperature overnight.
- Meanwhile, combine the fish sauce, garlic, ginger, and gochugaru.
- The next morning, press the vegetables and strain off the liquid that has pooled at the bottom of the container.
- Add the chili mixture to the vegetables and mix thoroughly. Cover and let stand at a cool room temperature for 48-72 hours.
- Transfer to the refrigerator. After about two weeks a tanginess will have developed.
- Store tightly covered in the fridge.
One thought on “Kim Chi”