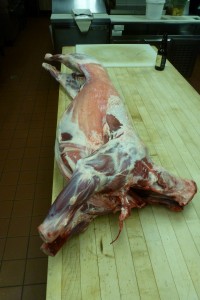
 Why buy whole animals and practice meat cutting at home?
It’s the cheapest way to get the highest quality, local meat into your kitchen.
It’s also a rewarding hobby, and if you’re sincerely interested in food and cooking, it’s the best way to learn the different cuts of meat, where they come from, and how they’re best prepared.
Buying whole animals is easy: find a producer that you trust, call them up, and they’ll most likely deliver the animal to your door. This post is about how to process that animal once it’s at your house. It covers basic safety principles, the equipment you’ll need, and some tips on managing time and space.
Temperature and Food Safety
Meat needs to be kept cold as it’s processed. Temperatures between 0°C and 4°C are considered safe. Temperatures between 4°C and 60°C encourage bacterial growth, and meat that stays in this range for more than two hours is considered potentially unsafe, even if it’s later cooked. This is simple enough for poultry or rabbits that can fit in the fridge, but how do you keep a large animal carcass cold during a process that might take a few hours? Unless you have a walk-in cooler, the simplest solution is to kick it old school and cut meat outdoors in the chilly shoulder seasons, when the temperature is around 0°C. You can set up shop in your garage or on your deck, and the meat will be able to sit for hours without warming up and entering the “temperature danger zone.” If it’s too cold to be working with your hands outside for hours at a time, consider breaking the animal into smaller sections called primals outside, then taking them one at a time into the house to break them down further. This way each primal is only spending maybe 30 to 45 minutes in warm temperatures.
Equipment
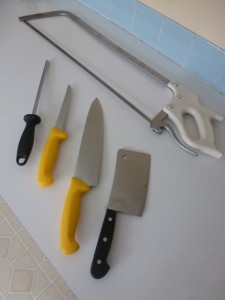
 Boning knife. This is the workhorse knife of the meat-cutter. It’s shorter and more slender than a typical chef’s knife, and is therefore easier to manoeuvre around bones and muscle groups.
Chef’s knife, aka French knife. It’s helpful to have a long, stiff knife for making straight cuts through meat, such as when slicing a large roast into steaks. Meat-cutters use an especially long, slightly medieval-looking knife called a scimitar, sometimes spelled cimeter. I use a 10″ French knife.
Handsaw. Handsaws are used for cutting through bones. While commercial North American butchers might break down an entire animal using just a bandsaw, the meat-cutting instructions on this site are actually designed to minimize the number of cuts made with a saw. Sawing creates bothersome bonemeal, and sometimes bone fragments, which are certainly unwelcomed guests at the dinner table. You can, strictly speaking, break down any animal using only a knife, but to get some classic cuts, like pork side ribs or bone-in sirloin steaks, you’ll need a saw.
While you can probably use a handsaw that you already have lying around your house, meat-cutting handsaws have a certain shape and density of teeth (measured in “teeth per inch,” or TPI) that make sawing through bone almost effortless. As a safety precaution, the teeth are shaped so that the saw only cuts as you push it away from you, not when you pull it towards you. They come in a variety of lengths. I use a 25″ meat-cutting handsaw. I mostly cut pork, and the 25″ saw lets me cut across the entire rib cage at once. I’ve tried longer saws and I find them unwieldy, but that has more to do with my own upper body strength than anything else. I would highly recommend buying one. They’re available at butcher supply shops like Halford’s, or hunting outfitters like Cabelas, and typically cost about $100.
Cleaver. Like the handsaw, this is not completely necessary. While a cleaver can punch its way directly through bones, I never use them for that, because of the above-mentioned bone fragments. I use a cleaver to break through tight joints and adhesions, like between the vertebrae.
Cleavers should be heavy in the hand but still easy to control. I bought a Henckels cleaver from Hendrix for $40.
More Safety
You will cut yourself. On a long enough timeline, every one cuts themself, even the pros. There are products made to avoid the worst kinds of cuts, like chainmail gloves to be worn on the non-knife-wielding hand, but the surest prevention is using caution and common sense. Never cut directly towards your hand or body. Never have two meat-cutters working the same piece of meat. Keep your knives impeccably, irreproachably sharp. Oh, and have a simple first-aid kit with bandages nearby.
Plan Your Cut Specs
Despite what the proctors of my journeyman cook exam might say, there is no set, proper way to cut any animal. There are many classical methods (notably French, British, American, and Austrian) but ultimately the correct way to cut meat is whatever way gets you the cuts that you want to cook or cure. Will the pork shoulder be kept as large roasts to make pulled pork, or cut into blade steaks to be grilled? Do you want to maximize the amount of belly you get from the pig, or do you want to leave long arcs of side meat on your pork chops? Think about this before the animal arrives.
Prepare Curing-Rubs and Brines in Advance
Meat-cutting can make for long, tiresome days, so anything that speeds up the process is most welcome. For instance. On most of the pigs I cut, the tongue, hocks, and hind leg are brined to make ham. Having that brine ready before I start cutting means that as soon as those pieces of meat come off the animal, I can throw them in the brine bucket and forget about them. The belly almost always becomes bacon. Having the cure mix ready, all I need to do is weigh the belly, scale the cure, rub the belly down, and put it in the fridge. I also turn the oven or barbecue on, and as soon as I’ve collected all my stock bones, I throw them into the fire to roast. These sound like small things, but when the day is long, and fridge and freezer space is at a premium, it helps to plan ahead.
Meat Storage
For me the only serious downside of buying whole animals and cutting them at home is that most of the meat has to be frozen. Freezing is hard on meat. As ice crystals grow, they puncture nearby cell walls, and when the meat thaws those cells leak fluid. It’s a small but noticeable compromise on quality.
There are two other risks in freezing meat, but with proper care they can be mitigated or avoided completely. The first is freezer burn. The atmosphere in fridges and freezers is actually very dry, so dry that frozen water on the surface of the meat can sublimate. The tiny holes that are left behind scatter light, and therefore appears as brownish scars on the meat. Protecting the meat from air is the surest way of preventing freezer burn, so all meat should be wrapped tightly in plastic bags.
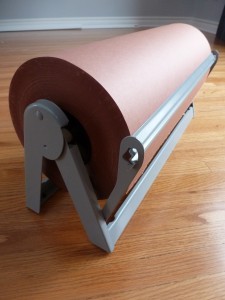
 The second major risk, especially since we are storing so much meat for so long, is that the fat can turn rancid. Whether in nuts, or oil, or meat, when fat oxidizes it takes on a peculiar smell that we describe as rancid. It’s not harmful, but it’s unpleasant. If you’re unsure what rancid fat smells like, go to the bulk section of a supermarket and stick your head in the bin of walnuts. Chances are they’re rancid. Exposure to light accelerates the oxidation of fats. Our freezers are dark most of the time, but as a further precaution the meat should be wrapped in opaque material to protect it from light. This is the chief function of butcher’s paper, which is a sturdy paper somewhere between printer paper and construction paper in weight. Typically one side of the paper is waxed. This side is meant to face the meat, and prevent meat purge from leaking out of the package. I bought the roll of butcher’s paper shown above from Halford’s. It cost $30 and will probably last for five years.
Once all your meat is cut and wrapped, you truly have a meat shop in your home, and every couple of days you get to pick through a selection and quality of meat that is unrivaled by any restaurant or butcher shop in town.
As far as freezer space goes, you can probably fit more meat into what you already have than you might think. A quarter of a pig could easily fit into the small freezer over your fridge. We have a chest freezer that is 32″ long and comfortably fits a quarter of beef, a side of pork, a whole lamb, and a miscellany of frozen fruit.
Thawing: More Safety
The absolute worst way to thaw meat is to let it sit on the counter. It’s inefficient, and unsafe. The outer surface of the meat, where any and all bacteria hang out, will stay in the temperature danger zone for several hours as the centre of the meat thaws.
The absolute best way to thaw meat is to remove the butcher’s paper, keep the plastic wrap on, and submerge the meat in very cold water. The heat exchange between the meat and water is crazy efficient, and the meat thaws while never straying above 4°C.
Thawing meat by letting it sit in the fridge is safe, but inefficient. Large roasts can take several days to completely defrost.
Conclusion
Now that you know the basics of cutting meat at home, you can start exploring the individual animal pages on Button Soup. Pork, lamb, poultry, and rabbit all have step by step meat cutting instructions. Some day soon I hope to have beef cutting posts, too. Bison and large game animals like moose and elk have pretty much the same skeleton and musculature as a cow, and are usually cut in the same manner as beef. Very small game animals like young deer can be divided like a lamb.
Resources
- Manual of Meat Cutting and Processing. This is published by the Canadian Professional Meat Cutters Association, and is the text used by the culinary and meat-cutting school at NAIT. It contains a lot of info that I will never use, like the guidelines on how industrially raised pork is graded, but it also has solid explanations of how to break up animals.
- The Art of Beef Cutting by Kari Underly is a beautiful book of cut-by-cut photos.
- Button Soup meat cutting posts also walk you through every cut for beef, pork, lamb, poultry, and rabbit