Having completed our mash, we are ready to boil. What I call “the boil” actually includes a number of steps:
- bringing the wort to a boil,
- adding hops,
- removing coagulated proteins and other impurities, and
- rapidly chilling the wort to fermentation temperatures.
There are several reasons the wort must be boiled:
- The bitterness, flavour, and aroma of the hops are best extracted at a rolling boil.
- Boiling deactivates malt enzymes, setting the gravity of the wort.
- Boiling sterilizes the wort.
- Boiling coagulates proteins and protein-tannin combinations, helping clarify the wort.
- Boiling drives off water, concentrating sugars and allowing the brewer some control over the gravity of the wort.
- Boiling over an open flame can lightly caramelize the wort, adding colour and flavour if desired.
- Boiling creates and then dissipates dimethyl sulfide, or DMS, which gives beer a distinct, undesirable green apple aroma. DMS precursors are naturally formed in the wort during the mash. They are able to become DMS at any temperature above about 140°F. However, a vigorous boil will actually drive the DMS away.

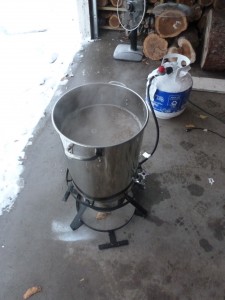
So, once we have separated the wort from the spent grain, the wort is brought to a fierce boil. A stove-top may not be able to sustain five or six gallons at such an excited state, so we bought a higher BTU turkey fryer from Bass Pro Shop. The kit included a 5 or 6 gallon stainless steel pot, a stand, a burner element, and a hose to connect to a propane tank.
The burner is actually connected to a timer box that kills the flame every 30 minutes. Apparently this is a safety precaution. The timer is easier cut out of the circuit. There’s a painful but informative video on how to do it here.
There were a couple other reasons we opted for the turkey fryer instead of the stove top. We figured it would be best to boil outdoors. The massive amounts of heat and steam generated during the boil will likely overwhelm your kitchen vent hood. I don’t even have a vent hood, so indoor boiling was definitely out of the question. The boiling wort also has a very strong, very peculiar grassy odour.
Since we have extracted proteins and amino acids from the grains, there is risk of a frothy head developing, and the pot will boil over if not carefully controlled. This will most likely happen as the wort first reaches the boil, when the heat is cranked.
About Hops. In Europe, beer has always been flavoured with herbs and spices, but before hops became the norm, a mixture called gruit, which might include rosemary, bogmyrtle, yarrow, coriander, and juniper, was used. Hops was first used in Bavaria, and the practice spread throughout Europe because it preserved the beer better than other bittering agents. It is now by far the most common way to bitter beer, though some craft breweries are toying with the old gruit mixtures.
Hops is a climbing vine in the hemp family. It’s a common ornamental plant, and can grow like a weed. In fact, there’s a hops plant down the street from me that has taken over a caragana bush and a lilac tree. Hops vines produce papery cones that are colloquially referred to as flowers or catkins, but are botanically properly called strobiles, whatever that means. At the centre of the catkin is a stem called a strig that is covered in an oil called lupulin. Lupulin contains the resins that give beer its bitterness, as well as some of its aroma and flavour. There are two types of acid in lupulin, called alpha and beta. The alpha acids are much more important, and in fact are used to measure the bitterness of each hops plant.
Fresh hops cones can be used to bitter beer, but the more common form is compressed pellets, available at homebrew shops. When you buy a little baggy of hops it will have the percent alpha acid written on the bag.
Different varieties of hops have very different bittering power, flavour, and aroma. The percent alpha acid gives you an indication of bittering power only. Flavour and aroma are determined by the variety of hops and where it was grown. There are countless varieties, but they are grouped largely into four styles that give some idea of flavour and aroma: British, German, Czech, and American. American hops, for instance, are known for the muscular scent of pine and exotic fruits like grapefruit, passionfruit, and sometimes even lychee.
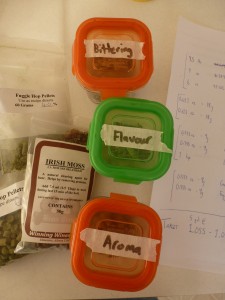
 Adding Hops. The flavourful compounds in hops are much more volatile than the bittering compounds, and the aroma compounds are even more volatile than these. If you were to add the aroma hops at the beginning of a two hour boil, the delicate, volatile aromatics would be destroyed. For this reason there are typically at least three hops additions during the boil. The first, done at the beginning of the boil, extracts bitterness. The next, done about fifteens minutes before the end of the boil, is for the more delicate flavours of the hops. And for the last minute of the boil, aroma-hops are added.
Removing Trub. After the boil is complete, there will be a lot of sludge in the pot. These are the various proteins and tannin-protein combos that were coagulated by the boiling. It looks disgusting, but is called trub. There are a few traditional ways of dealing with trub, but the reality is that it will settle to the bottom, and you can simply syphon the clean wort off of it.
Chilling Wort. Though the aggressive boil has driven off a lot of DMS, there are still some precursors in the wort. As long as the wort is held above 140°F (60°C), these precursors will slowly turn to DMS. We therefore want to chill the wort very quickly.
There are many ways to do this. At this time of year you could easily cover the boiling pot and set it in a snow bank, but serious homebrewers use some form of heat-exchanger. There are two main styles used in homebrewing: submersible and counterflow. Submersible heat exchangers are coils of copper tubing, submerged in the hot wort, that have cold water running through them. Many people brew great beer with this style of chiller, but from a heat exchange standpoint it isn’t ideal. You have a relatively small amount of cold water chilling a very large amount of hot wort. And since you are cooling the entire batch at once, the temperature drop is slow, and you spend more time in the DMS and pathogenic danger zones.

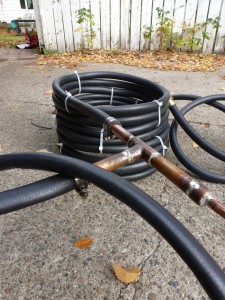
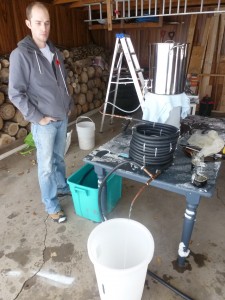
A Counterflow Wort Chiller. In a counterflow wort chiller, the hot wort is gravity drained through thirty feet of copper tubing. The copper tubing is fed through a wider rubber hose, through which cold water is pumped in the opposite direction of the wort. In the time is takes the wort to travel through the coil, less than five seconds, it goes from about 200°F to 50°F. I guess it actually works a little too well, because you have to wait for the wort to come up to room temperature to take accurate gravity readings and pitch the yeast.
I could explain how I built my chiller, but I’d just be rehashing the sites that taught me: this one and this one. The only special skill required is soldering some copper joints. I had never done this before. I watched a YouTube video and fifteen minutes later I was soldering. It felt like I was in the Matrix and someone back in the real world had uploaded a lifetime of kung fu into my brain. Yay for the information age. Anyways, if you already have soldering equipment (a blowtorch, flux, and solder) you can build this chiller for less than $100 bucks. All you need is:
- $60 of copper tubing from a plumbing supply shop
- $20 of rubber hose from a hardware store
- $15 worth of copper connections, tie wraps, hose clamps, et c. from a hardware store
The biggest problem is keeping the chiller clean and rust-free.
Conclusion
The old saying is, “Brewers make wort. Yeast makes beer.” At this point, we have completed the formulation of wort, and therefore our responsibilities as brewers are largely done; the yeast is going to take over for a week or two.
Next up: Fermentation.
