A detailed introduction to sausage-making at home: ingredients, equipment, theory, and procedures.
What are sausages?
Sausages are ground meat, usually stuffed into a casing, though there are certain sausages that aren’t in casings. For instance there are sausage “patties” and sausages en crepinette, which are patties wrapped in caul fat. For now let’s be content to say that sausages are ground meat stuffed into casings.
Why do we grind meat?
1. To tenderize
Meat is made of fibers that are surrounded by connective tissue, which are then bundled together in more connective tissue. Highly exercised muscles tend to be higher in connective tissue. Examples include:
- on a pig: shoulder, hock, neck
- on a cow: chuck, brisket, shortrib, shank
- on a lamb: shoulder, shank
There are many ways to tenderize meat that is high in connective tissue. Long cooking at relatively low temperatures in moist environments converts a connective tissue called collagen into gelatin. When we braise or stew meat we are tenderizing the flesh by converting collagen to gelatin.
You can also mechanically tenderize meat by physically breaking or separating the connective tissue. Examples would be when we needle or perforate steaks, mallet schnitzel, chop tartare or slice carpaccio, but the supreme example is when we grind meat. Here we are cutting every bit of meat, fat, and connective tissue so that is no more than 1/4″ long or shorter.
2. Economy
When fabricating choice cuts such as chops and roasts, lots of meat and fat are trimmed away. The trim pieces are too small, inconsistent, and fatty to be cooked individually or stewed. By grinding and mixing that trim we produce a delicious, cohesive dish, saving what would otherwise be wasted. This is not so relevant to most home cooks (unless you take up meat-cutting at home, which you should), but it is certainly one of the most important historical reasons for making sausage.
3. Pleasure!
Ultimately we grind meat because of the unique gastronomic pleasures of the sausage: the “snap” of the casing, and the luxurious, savoury interior.
Basic Ingredients: Meat, Fat, Salt, and Casings
Meat (and Fat)
At the start of this post we described sausages as ground meat stuffed into casings. It is important to note that when we say “meat”, we actually mean “meat and fat”. Having a good fat content is critical to having a moist, flavourful sausage. Fat is the source of most of meat’s flavour (read more here), which is why a fatty rib chop tastes “porkier” than a super-lean centre cut chop. Fat is also responsible for the moist mouthfeel of a good sausage, far more than the actual water-content of the meat.
In former times, sausages were much higher in fat than today, up to half fat and half meat. For the modern palate, the ideal ratio is 1:3 fat:meat, or about 25% fat by weight. It just so happens that pork shoulder naturally contains this ratio, so this is a great cut of meat to seek out for your first sausage-making adventures.
The term pork shoulder refers to the entire shoulder/front leg of the pig (more info here). In meat shops it is broken up and sold under many different names, including: pork butt, Boston butt, blade roast, and picnic ham. Note that a picnic ham is a fresh cut of pork, not a cured ham. Your safest bet is to call your preferred butcher shop (see Resources below) in advance, and tell them you’d like “x” kilos of pork butt for sausage-making.
When using other, leaner cuts of meat like turkey breast or wild game, we need to add pure fat to achieve the proper meat/fat ratio. This added fat is almost always pork fatback (back fat), which has a neutral taste and a creamy consistency. Other fats, such as suet, are also sometimes used. Cream and eggs are classic additions to boudin blanc, as well as some bratwurst. Fatback can also be procured from your butcher of choice.
Salt
Salt’s primary function is to enhance the flavour of the meat. It also extracts protein from the meat, which will help the sausage bind in the mixing phase (described below), and result in the characteristic, cohesive, springy texture we expect from a sausage.
The ideal ratio of salt to meat and fat is 1:60 by weight.
Casings
Natural casings are made from intestines. Over the course of history I’m sure that every section of the intestinal tract of every type of animal has been used as a casing. There are old-school sausages that use the esophagus or neck, haggis uses sheep stomach, and the traditional casing for mortadella is actually a pig’s bladder.
By far the most common casings are “hog casings” which are the inner lining of the small intestine of a pig, exhaustively cleaned. Other common natural casings include hog middles (slightly larger), hog bungs, lamb casings, beef rounds, and beef bungs. All these casings having different diameters when stuffed. The average stuffed diameter is given on the bag in millimeters. Most of my sausages are made with 29-32 hog casings, which means the stuffed sausages have a diameter of about 3 cm.
To buy casings you need to seek out a butcher supply shop like the ones listed in the Resources section at the bottom of this post.
Casings are usually packed in dry salt or brined in order to be preserved. Casings that are packed in dry salt must be soaked in clean water for about thirty minutes before being stuffed.
There are also artificial casings available made from collagen and cellulose. I don’t have much experience with these, but in the few times I’ve used them I’ve found them extremely difficult to work with, and not having as good a “snap” as natural casings. If you think otherwise I would love to hear your perspective.
Basic Processes and Equipment
Prep
As with any kitchen endeavor, first comes prep:
- remove any silverskin and glands from the meat
- dice the meat and fat so that it will easily fit into the grinder
- soak the casings
- at least thirty minutes, preferrably an hour
- flush, reserving some of the liquid to lubricate the stuffer nozzle
- if you find you have soaked too much casing, the extra lengths can be re-salted
Grinding
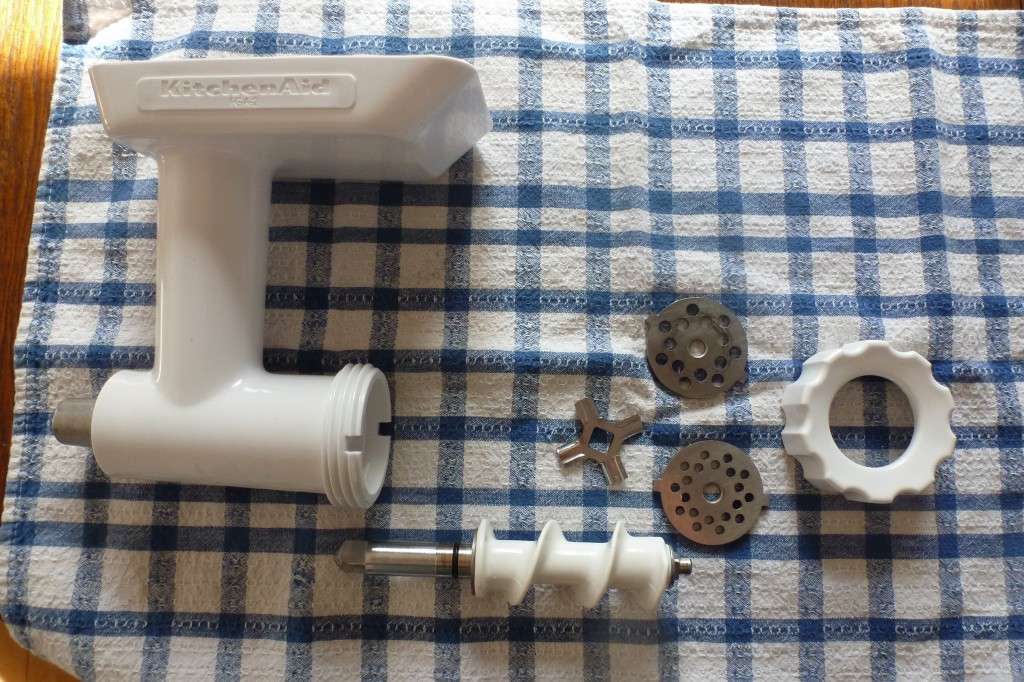
Grinders consist of (from left to right in the picture below) a house or body, a worm, a blade, a plate or die, and a collar. The worm pulls the meat through the body, then forces the meat partway into the plate, where the blade cuts it. The collar simply keeps the worm, blade, and plate within the housing. The plate determines the texture of the grind. The plates featured below have hole diameters of 1/4″ and 3/16″.
For my first several sausage-making sessions I used the grinder attachment for the Kitchen Aid stand mixer. I got it for about $70 at Sears. It works okay, but when the meat is properly chilled (ie. partially frozen, see below) the motor of the mixer struggles a bit. If you plan on making sausages frequently, or more than 5 lbs at a time, I would look into a proper, stand-alone grinder, which can be purchased from any butcher supply shop, for anywhere from $100 to $Zillion. I now have a counter-top unit that cost about $150 at Princess Auto.
 The most important part of the grinding process is to keep the meat and fat very, very cold. This is important from a food safety standpoint, but also for the quality of the final sausage. When the meat and fat are sufficiently cold, the blade and plate cut through the fat very cleanly. The meat and fat are extruded very cleanly from the grinder plate. When the meat and fat are not cold enough, or the blade not sharp enough, we rupture the cells in which the fat is stored, and when the sausage is later cooked, the fat renders and runs out of the sausage.
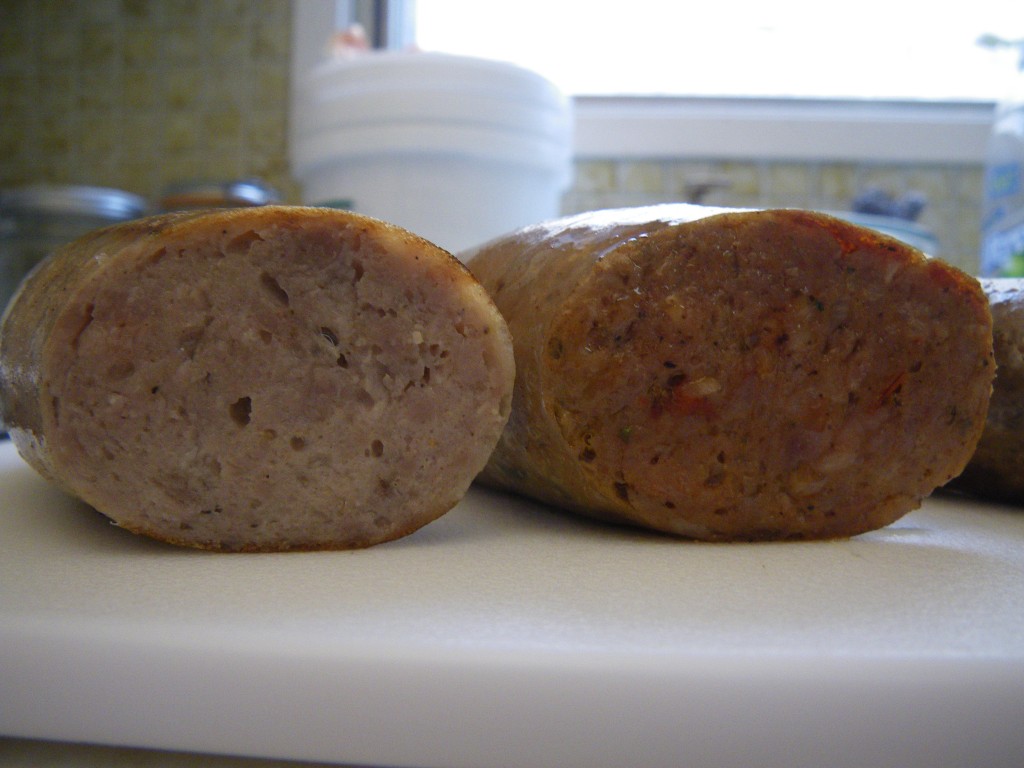
To make sausages with a fine texture, you can use a technique called progressive grinding. The meat is run through the grinder multiple times, each successive grind using a finer plate.
Grinding the fat and meat through different-sized plates can result in interesting, rustic textures.
Mixing
It’s really important to mix the ground meat. By adding a small amount of very cold liquid (ice water, vinegar, wine, et c.) and mixing, we develop a protein called myosin which helps the sausage bind together. The process of mixing forcemeat in the presence of liquid to develop myosin is a bit like kneading flour and water to develop gluten. A bit, anyways. I typically mix my forcemeat for a couple minutes, using the paddle attachment of my stand mixer. The meat will bind together to form a ball that cleans the sides of the bowl (again, kind of like bread dough). The meat will also take on a “fuzzy” appearence, with fine strands of meat and fat sticking out from the main mass.
After mixing you should cook off a bit of the sausage and taste for seasoning. Always, always do this, even if you’re sure you’ve followed your recipe correctly.
Stuffing
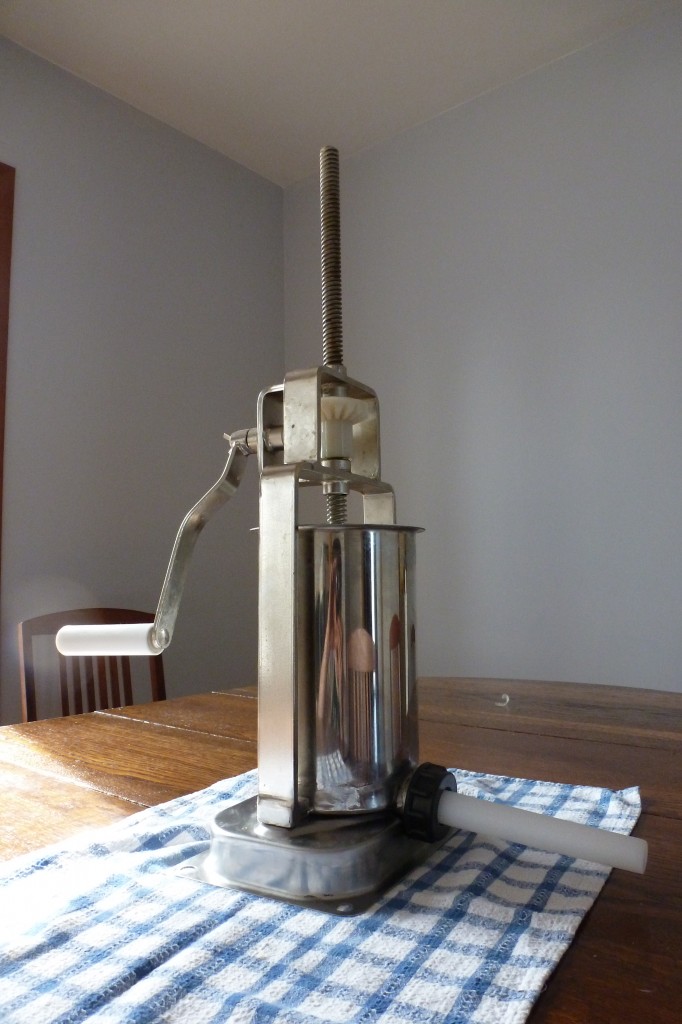
While in former times I’m sure meat might have been simply spooned into casings, or forced through a funnel, for best results you’ll need a proper stuffer. Sausage stuffers have a large cylinder that holds the mixed forcemeat, and a crank that drives a piston down onto the meat and forces it out a nozzle at the bottom of the cylinder. The casing is bunched onto the nozzle, and as the meat comes out of the nozzle it takes the casing with it.
I bought my 5 lb stuffer (ie. it holds about 5 lbs of meat) from CTR Refrigeration for about $100. It’s been good to me. One time one of the plastic gears broke, but that was because a friend continued to turn the crank once the piston had reached the bottom of the cylinder. Replacement gears were $20.
We want plump sausages. The goal of stuffing is to pack the meat into the casing as tightly a possible without breaking the casing. We also want the stuffing to be uniform and compact. The key to this is even crank speed and pinching the casing against the nozzle to build a bit of back-pressure.
Linking
The standard length for a sausage is six inches. Obviously this can be adjusted. You can make cocktail wieners by using lamb casings and twisting into 2-3″ links.
There’s a trick to linking sausages. Twist off your first link by turning the sausages away from you. Measure the second link, then skip it, without twisting. Measure the third link, and turn it away from you so that you are twisting off both ends of the third link at the same time. Continue in this way, skipping every other link, until the entire length is linked.
There are two reasons to use this method. First, it’s fast, because you’re only twisting every other link. Second, it ensures that each link is twisted off in the opposite direction from the ones on either side of it, which will prevent the links from untwisting when you move or hang the sausages. It’s hard to wrap your head around, but it works.
Hanging
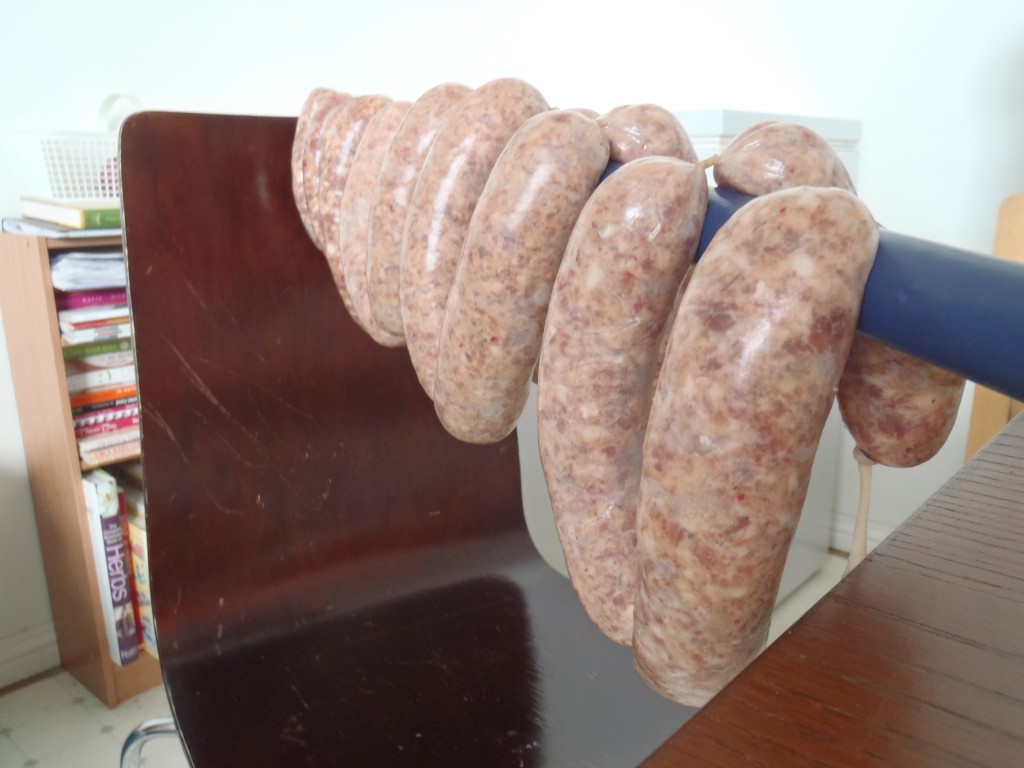
Hanging does two things. First it dries out the surfaces of the sausages. Once the casing is a bit dry, the sausages have a darker, more vibrant colour. If you pan-fry them, they will brown better because there is less moisture. They will also freeze better, forming less ice crystals.
Second, it compacts the meat further and results in a denser, more uniform texture.
I hang my linked sausages on a broomstick for an hour or two, until the colour changes.
Types of Sausages
Fresh Sausages
- fresh sausages are simply ground meat, stuffed into casings, as described above
- they must be cooked or hot-smoked before eating
- like all fresh meat, they keep in the fridge for only a few days
- fresh sausages may contain sodium nitrite to enhance the colour of the meat (for the complete skinny on curing salts, read this)
Cold-Smoked Sausages
- eg. hot dogs, some kielbasa,
- these sausages are smoked for a few hours or days at very low temperatures, so they must contain sodium nitrite
- they are typically poached afterward smoking
- since they have been cooked, they only need to be reheated to eat
Fermented Sausages
- eg. salami, summer sausage
- fermented sausages have sugar and active bacterial culture added to the meat and fat
- the bacteria eat the sugar and produce lactic acid, giving the sausage a tangy flavour
- a product called “Fermento” can add the flavour of traditional fermented sausages without actually fermenting them
- fermented sausages are almost always dried (see below)
Dry-Cured Sausages
- eg. salami, saucisson sec
- dry-cured sausages are cellared until they have lost about one third of their weight
- they must contain sodium nitrate
- the meat used in dry-cured sausages must be treated for trichinosis, usually by freezing
-
- consult reference for proper freezing times and temperatures
-
- dry-cured sausages do not need to be cooked
Resources
Books
- fantastic primer and reference: Charcuterie by Michael Ruhlman.
- intermediate-level techniques, drying set-ups, obscure recipes: Cooking by Hand by Paul Bertolli.
- lots of interesting recipes: Bruce Aidells’ Complete Sausage Book, by Bruce Aidells and Denis Kelly.
Websites
- recipes, processes: www.curedmeats.blogspot.com
Equipment, Casings, Curing Salts
-
- Halford’s Hide
- 8629 – 126 Avenue
- 780-474-4989
- Butchers and Packers Supplies
- 12225 Fort Road
- 780-455-4128
- www.sausagemaker.com
- Halford’s Hide
Ingredients
-
- your local butchers and farmers’ markets


